Pranjal - BlogsUnlocking the Power of Google OAuth 2.0 with Passport.js: A Step-by-Step Guide
Step 1: Gear Up! 🛠️
First things first, let’s install our tools. Fire up your terminal and run:
npm install passport passport-google-oauth2 express-session
These packages are your new best friends for implementing Google OAuth 2.0.
Step 2: Google Developer Console Adventure 🗺️
Time to set up your project in the Google Developer Console. Here’s your treasure map:
- Head to the Google Developer Console.
- Create a new project (give it a cool name!).
- Navigate to “APIs & Services > Credentials”.
- Click “Create Credentials” and choose “OAuth 2.0 Client IDs”.
- Set up your consent screen (don’t forget to smile for the icon!).
- Configure your OAuth 2.0 Client ID (Web application type).
- Add your redirect URI (e.g.,
http://localhost:3000/auth/google/callback).
Pro Tip: Keep your Client ID and Client Secret safe. They’re like the keys to your OAuth kingdom!
Step 3: Passport Configuration Magic ✨
Now, let’s sprinkle some Passport.js magic into our app:
const passport = require('passport');
const GoogleStrategy = require('passport-google-oauth20').Strategy;passport.use(new GoogleStrategy({
clientID: process.env.GOOGLE_CLIENT_ID,
clientSecret: process.env.GOOGLE_CLIENT_SECRET,
callbackURL: "http://localhost:3000/auth/google/callback"
},
function(accessToken, refreshToken, profile, done) {
// Your user-saving logic goes here!
User.findOrCreate({ googleId: profile.id }, function (err, user) {
return done(err, user);
});
}
));
// Don't forget to serialize and deserialize your users!
passport.serializeUser((user, done) => {
done(null, user.id);
});
passport.deserializeUser((id, done) => {
User.findById(id, (err, user) => {
done(err, user);
});
});
Step 4: Route to Success 🛣️
Let’s set up our authentication highways:
const express = require('express');
const passport = require('passport');
const app = express();
app.use(passport.initialize());
app.use(passport.session());
// The gateway to Google OAuth
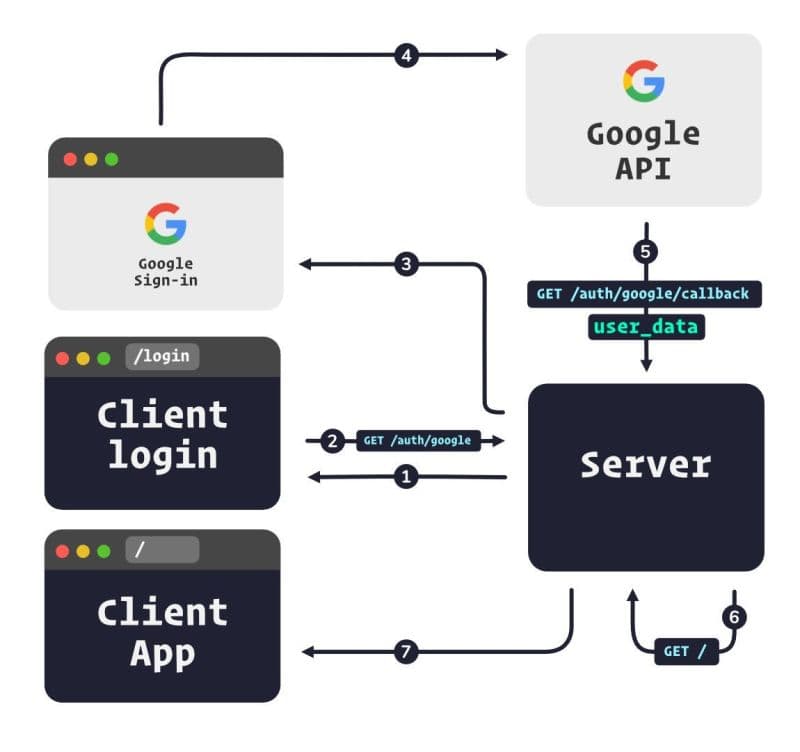
app.get('/auth/google',
passport.authenticate('google', { scope: ['profile', 'email'] })
);
// Welcome back! Handle the callback
app.get('/auth/google/callback',
passport.authenticate('google', {
successRedirect: '/auth/google/success',
failureRedirect: '/auth/google/failure'
})
);
// Success and failure destinations
app.get('/auth/google/success', (req, res) => {
res.send('Welcome aboard! 🎉');
});
app.get('/auth/google/failure', (req, res) => {
res.send('Oops! Something went wrong. 😢');
});
app.listen(3000, () => {
console.log('Server is up and running! 🚀');
});
Step 5: Launch Time! 🚀
Set up your environment variables (GOOGLE_CLIENT_ID and GOOGLE_CLIENT_SECRET), and you’re ready for liftoff!
node app.js
Navigate to http://localhost:3000/auth/google, and watch the magic happen!